Saturday, December 3, 2016

KU "ROOT" SIMU NI NINI?. ULISHAJIULIZA AU ULISHATAKA KUROOT SIMU YAKO?. SOMA MAKALA HII UPATE KUELEWA

Jinsi ya ku ‘root’ simu yako ya Android.

Android ni Mfumo wa simu (Operating System) ambao unaboreshwa siku hadi siku. Mfumo huu una majina tofauti kutegeana na toleo lake. Haya ni Matoleo (Versions) mbalimbali ya Android kuanzia ya kwanza mpaka ya mwisho;
1. Cupcake (1.5)
2. Donut (1.6)
3. Éclair (2.0 – 2.1)
4. Froyo (2.2 – 2.2.3)
5. Gingerread (2.3 – 2.3.7)
6. Honeycomb (3.0 – 3.2.6)
7. Ice Cream Sandwich (4.0 – 4.0.4)
8. Jelly Bean (4.1 – 4.3.1)
9. KitKat (4.4 – 4.4.4)
10. Lollipop (5.0 – 5.1.1i
Matoleo haya huboreshwa kadri yanavyozidi kutolewa. Kujua toleo la simu yako nenda Settings – About phone – Android Version. Ukikuta Jelly Bean, KitKat au Lollipop hongeara! kwani unatumia matoleo ya mwisho yalioboreshwa!!
Mfumo huu wa Android unafaa kufanyiwa settings mbalimbali na kuwekewa Program mbalimbali ili kumfanya mtumiaji aifurahie simu yake kwa asilimia 100, lakini shida huja kwamba sio kila PROGRAM inayowekwa katika mfumo huu wa Android inakubali kufanya kazi!! Wapo watengenezaji wengi wa program (Software Designers) ulimwenguni. Sasa watengenezaji wa mfumo huu wa Android wamezuia Program ambazo hazijatoka kwao zisifanye kazi kwenye mfumo huo kwa sababu za kimaslahi.

HAPA SASA TUTAPATA KUELEWA MAANA YA KU ‘ROOT’ kua ni kuifanya simu ikubali Program zilizozuiwa na watengenezaji wa Android (Android Developers). Ukishai ‘root’ simu yako sasa utakua na uwezo wa kuweka program zinazohitaji ‘root permission’ kwenye simu yako.

JINSI YA KU ‘ROOT’ SIMU YAKO.
Kuna aina za simu ni rahisi sana ku root, lakini nyingine zinahitaji utafiti wa kina na muda wa kutosha. Zipo program nyingi sana zinazoweza kutusaidia zoezi hili. Mojawapo ya Program ambazo zinajulikana sana kwa ku root simu ni kama vile KingRoot, Vroot, Kingoapp Root, SRSRoot, Framaroot, Root Master, z4root, Universal root, Easy root, nk.. Baadhi ya Program hizi zitahitaji Computer, nyingine hazihitaji.
Katika Makala hii tutaelekeza kwa kutumia Program iitwayi KingRoot ambayo inakubali kufanikisha zoezi hili kwenye asilimia kubwa ya simu za Android. Program hii haihitaji Computer. Kuipata nenda Google kisha I isearch na kui download. Kwa msaada uliza……
Maandalizi:
(i) Charge Simu yako, angalao ijae kwa 50%
(ii) Wezesha ‘’Developer Options” kwenye simu yako. Menu hii imefichwa kwa watumiaji wa kawaida. Sisi tunataka kutumia simu zetu kwa 100%. Sasa kuifichua nenda Settings>About phone>Build number. Baadhi ya simu (LG na HTC) nenda Settings>About phone>Software information>Build number. Ukishafika kwenye Build number gusa hapo mara saba (tap 7 times)…mpaka uambiwe “You are now a Developer”
(iii) Sasa nenda Settings>Developer options>USB debugging. Weka tiki hapo (kama haipo)
(iv) Nenda settings>Security>Unknown Sources. Weka tiki hapo (Kama haipo).
Hapo maandalizi yatakua ni tayari. Sasa download KingRoot 4.0 (or above) kwa kui search kwenye Google kisha Install kwenye simu yako. Baada ya ku install gusa ‘Open’. Baada ya hapo KingRoot itafunguka na itaitambua simu yako automatically—Model ya Simu na Toleo lake. (Mf. Model: H6 Android 4.4.2). Kama simu yako haijawahi kuwa rooted utaona ‘Root access is unavailable’. Chini gusa ‘START ROOT’. Hapo KingRoot itakua inakomboa simu yako kutoka kwenye kifungo cha maisha…kuwa na subira zoezi hilo litachukua muda kidogo (sio Zaidi ya dak 6)…mpaka utakapoona ‘ROOT SUCCSSFULLT’ DONE!!!!! YOU ARE NOW A SUPERUSER…!!!!!
--
Ili kuhakikisha kama simu yako imeshakuwa rooted, nenda PlayStore kisha download Root Checker. Ukishai Install na kuifungua gusa ‘VERIFY ROOT’. Ukiona ‘’Congratulations! Root access is properly installed on this Device” HAPO KILA KITU TAYARI!!!!!
FAIDA ZA KU ROOT SIMU:
1. Utaweza ku update toleo la mfumo wa simu yako (Kuflash). Mfano kama unatomia Android 4.4.2 (KitKat) unaweza kui update kwenda Android 5.0 (Lollipop) Simu ya Android haiwezi kuflashiwa bila kuwa rooted!
2. Hua inatokea simu kuibiwa. Wewe unaesoma Makala hii usiibe simu ya Android siku hizi (ukiokota mtafute mwenye nayo). Nitafute nikupe story!! Sasa zipo program nyingi za ku track simu yako wakati imeibiwa lakini nyingi huondoka kwenye System ya simu yako baada ya kufanyiwa ‘Factory reset’ au kuflashiwa. Kama ume root simu yako, zipo Program za kuitafuta simu yako ambazo hata mtuhumiwa aiflash au aireset….BADO ITAKUWEPO TU! Mfano wa Program hizo ni Cerberus.
3. Utakua na uwezo wa kuweka Program nyingi na nzuri za kuifanya simu yako iwe fasta na kuboresha muonekano (performance and appearance). Pia kuna program za kutunzia chaji, Kuzuia matangazo kutoka Google (mf. AdAway), n.k…. ambazo hazitafanya kazi bila root

ZINGATIA:
Rooting inaweza kuharibu kabisa simu yako na kuifanya isiwake tena!! (Mimi hapa sitahusika kwa lolote). Usiogope, hii huwatokea wale wanaokurupuka na kutofuata maelekezo. Mimi binafsi nishairoot simu yangu na za Marafiki zangu zisizopungua 20 bila madhara yoyote kutokea. Fanya utafiti kwanza ni program gani sahihi ku root simu yako, omba ushauri,…..
Pia Rooting inaharibu Warranty ya simu yako. Kama ulipewa Warranty uliponunua simu yako na ukaikuta na tatizo, ukiirudisha haitakubalika. Aidha, inawezekana pia ku’unroot’

HITIMISHO:
Kwa yeyote ambae ni mdadisi na mtafiti, anaependa kusaidiwa na Technologia, kuna ulazima wa kuroot simu yake. Baada ya Makala hii, wale woote ambao tutaenda sambamba tutaanza kupitia Programs nyingi ambazo zinahitaji ‘Root Permission’.

MAANA HALISI YA KOMPYUTA YAWEZA KUA HII HAPA

Kompyuta ni nini:

Kompyuta ni kifaa elektroniki kwamba ni iliyoundwa kufanya kazi na Habari. kompyuta mrefu linatokana na Kilatini 'computare' mrefu, hii ina maana kwa mahesabu ya au mashine programmable. Kompyuta hawezi kufanya kitu chochote bila ya Programu ya. Ni inawakilisha idadi decimal kupitia kamba ya tatu mapacha. Neno 'kompyuta' kawaida inahusu Center Processor Unit plus kumbukumbu ya Ndani.
Charles Babbage inaitwa "Grand Baba" ya kompyuta. Awali mitambo ya kompyuta iliyoundwa na Charles Babbage aliitwa Analytical Engine. Ni matumizi kusoma tu kumbukumbu katika mfumo wa kadi ngumi.
Kompyuta ni kifaa elektroniki ya juu kwamba inachukua takwimu ghafi kama pembejeo kutoka kwa mtumiaji na michakato ya data hizi chini ya udhibiti wa seti ya maelekezo (aitwaye program) na inatoa matokeo (pato) na anaokoa pato kwa matumizi ya baadaye. Ni inaweza mchakato wote namba na mashirika yasiyo ya namba (hesabu na mantiki) mahesabu.
Ufafanuzi Digital kompyuta
vipengele msingi wa kisasa ya digital kompyuta ni:
Pembejeo hila, Pato hila,
Kati Processor Unit (CPU), molekuli kuhifadhi kifaa na kumbukumbu. kompyuta ya kawaida kisasa inatumia LSI Chips.
Kazi manne kuhusu kompyuta ni:
anapokea data Input
michakato ya data shirikisho
inazalisha pato
pato
Maduka ya matokeo Uhifadhi
Pembejeo (Takwimu):
Pembejeo ni maelezo mbichi aliingia katika kompyuta kutoka vifaa pembejeo. Ni mkusanyiko wa barua, idadi, picha nk
mchakato:
Mchakato ni uendeshaji wa data kama kwa maelekezo yaliyotolewa. Hii ni kinyume kabisa ndani mchakato wa mfumo wa kompyuta.
pato:
Pato ni data kusindika uliotolewa na kompyuta baada ya usindikaji data. Pato pia hujulikana kama Result. Tunaweza kuokoa matokeo haya katika kuhifadhi vifaa kwa ajili ya matumizi ya baadaye.
Kompyuta zingine By Size and Power
Kompyuta yanatofautiana kulingana na uwezo wao data usindikaji. Wao ni classified kulingana na kusudi, utunzaji data na utendaji.
Kwa mujibu wa utendaji,
kompyuta ni classified kama:
• Analog kompyuta: kompyuta kwamba inawakilisha idadi na baadhi ya wingi kuendelea kutofautiana kimwili, ambaye tofauti mimic mali ya mfumo wa baadhi ya kuwa inatokana.
• kompyuta binafsi: kompyuta binafsi ni kompyuta ndogo na gharama nafuu. neno "kompyuta binafsi" hutumika kuelezea
kompyuta desktop (desktops).
• Workstation: terminal au desktop kompyuta katika mtandao. Katika hali hii, workstation ni tu generic mrefu kwa ajili ya mashine ya mtumiaji (mteja mashine) kwa kulinganisha na "server" au "mainframe."
• minicomputer: minicomputer
si mini sana. Kwa uchache, si kwa njia wengi wetu kufikiria mini. Unajua jinsi kubwa yako binafsi
kompyuta ni na familia yake kuhusiana.
• Mainframe: Ni inahusu aina ya kompyuta kubwa kwamba anaendesha shirika zima.
• kompyuta zenye nguvu: Itis kubwa, kompyuta kasi, na gharama kubwa zaidi duniani.
• Microcomputer: binafsi yako
kompyuta ni microcomputer.

Monday, June 27, 2016

Difference Between Intel Core i3, i5 and i7

Intel is a great processor manufacturing company but they have a way of confusing the buyers with fancy names like Core i3, Core i5 and Core i7. I am sure you would have heard these terms at least once in a while and wondered what they mean. Today we will discuss the basic differences between Core i3,i5 and i7 processors which i think would help you a lot in choosing your next PC.


History

In the early days, CPU power was completely taken as the clock speed at which it runs. The clock speed of a CPU gives us a nice understanding on how fast a CPU works but not actually how powerful it was. For example a CPU with a 3.0 GHz runs faster than a CPU with 2.5 GHz but the later one may be able to do more work per cycle enabling it to outperform the first one. Intel introduced naming the CPU’s differently (AMD was the first to do though but it didn’t work well for them)  using ‘Core’ naming to move out of the clock speed race.

Difference between Intel Core i3, i5 and i7 in a Nutshell

To conclude in a statement, Core i7s are better than Core i5s, and Core i5s are better than Core i3s. The main reason here being performance. In general, Core i3 chips are found in budget PCs and low-end laptops. For a normal user who does browsing and watching videos, Core i3 works just fine. Core i3s have a low Cache size.
The mainstream or mid-range systems usually  have i5. Systems with Core i5 are good for a moderate user and light gamer.
The Core i7 CPUs are reserved for – and found usually in – high-end, expensive laptops and PCs. These are used by users who wish to do video editing, Lot of Gaming and other CPU intensive stuff.

Number of cores: Core i3, i5 and i7

Intel is again into the confusing the users work here. Typically all the Core i3s are dual core with Hyper-Threading capabilities found in many of them.
The desktop range Core i5s  are quad-core while the one’s used in Laptops ( Mobile versions) are dual-core. All Core i5s have Hyper-Threading and Turbo boost features enabled.
The Core i7s have a lot of variations in them the laptop CPUs are dual-core while the Extreme edition desktop CPU’s have upto 12 cores. Normal desktop Core i7s have 4 to 6 cores with Hyper-Threading, Turbo boosting and Overclocking abilities.
Core i7s are the best Intel has to offer for general consumers while Core i3s being the most affordable in the series ( forget Pentium).

Sunday, June 12, 2016

Important Tips About Computer power supply

Computer power supply is the electric source of all components of a computer. Though it is one of the neglected one compare to the other parts, power supply is a must for a system. Often this part of a computer gets failure and most of the time it is not serviceable.

It will be more easier and cheaper to replace than try to service it.

You should give due attention like you do for other components when you choose or replace the power supply unit. 

Function of computer power supply

The function of power unit is to convert the electrical power (AC) comes from wall socket to a suitable type and voltage (DC) so that each component of a computer works properly.

Luck of proper supply of power will damage a computer system. The power supply receives 120 or 230V and converts into 3.3V, 5.5V and 12V. Why different converted power? That is because all components of a computer system don’t need the same power.

For example, motherboard and cards use 3.3V. The most power demand parts such as Fan and drives need 12V to operate.


Choosing Computer power supply

Usually, power units comes with a case, however, it is a requirement to know the factors behind this unit before picking a new one. Power supplies available on the market have different size and shape that will fit into a particular type of computer case. This is called Form factor, layout and dimensions of a unit.

When you are going to replace a malfunction power unit, you should choose the exact form factor that will go with the existing case of your computer.

There are different power supply form factors, but ATX and LPX are the popular types found in most systems.

Tuesday, June 7, 2016

Tips To Extend The Life Of Your office’s Computers

Four Money-Saving Tips To Extend The Life Of Your office’s Computers
Small business owners are constantly facing pressure to compete with larger corporations and are forced to try to save money in the process.

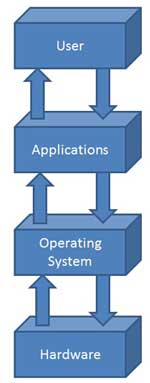
what is computer Operating System?........ and what are the Characteristics of Operating System?

Operating Systemcomputer Operating System
It is a program with following features:
  • An operating system is a program that acts as an interface between the software and the computer hardware.

Things to consider when buying a life time computer

This chapter gives the following information:

  • In this guide, we'll help you to buy a desktop on component by component basis.

Relationship between computer Hardware and computer Software

Hardware represents the physical and tangible components of a computer i.e. the components that can be seen and touched.
Examples of Hardware are following:
  • Input devices -- keyboard, mouse etc.
  • Output devices -- printer, monitor etc.
  • Secondary storage devices -- Hard disk, CD, DVD etc.
  • Internal components -- CPU, motherboard, RAM etc. 

Relationship between Hardware and Software

  • Hardware and software are mutually dependent on each other. Both of them must work together to make a computer produce a useful output.
  • Software cannot be utilized without supporting hardware.
  • Hardware without set of programs to operate upon cannot be utilized and is useless.
  • To get a particular job done on the computer, relevant software should be loaded into the hardware
  • Hardware is a one-time expense.
  • Software development is very expensive and is a continuing expense.
  • Different software applications can be loaded on a hardware to run different jobs.
  • A software acts as an interface between the user and the hardware.
  • If hardware is the 'heart' of a computer system, then software is its 'soul'. Both are complimentary to each other.

Monday, June 6, 2016

This Copy Of Windows Is Not Genuine Error Fix,..

Today I’m pretty excited to share the common error named this copy of windows is not genuine fix. Windows is the far better Operating System that what I recommend for any kind of business works, for personal needs go for Mac. Though windows is the legend in the industry it has huge errors list which makes the users frustrated when they’re busy with their works. I know how much irritating is this windows not genuine error is. So I thought in solving this Windows is the genuine error if my beloved readers are facing it. This error is very common in build 7600.


Well, we’ll walk you through the complete step-by-step process on how you can fix this windows not genuine errori will educate your why and how this types of Windows error causes and their precautions to prevent these type of errors. As, I have already told you that this error generally arises in Windows 7, so you will be reading about this copy of windows is not genuine windows 7 fix. In other words, we are sharing not a genuine copy of windows 7 fix. Now a days, many guys are also getting this copy of windows is not genuine build 7601 error. So, guys are updating this post by listing all possible solutions of this error.
Why You Need To Get Rid of This Error? 
There are many strong reasons that withstand why you need to fix this error in your computer. So I’ve mentioned them below,
  • It is the most irritating error which prompts on the regular intervals which reduces your overall productivity.
  • This error gradually reduces the performance of your computer, which makes it damn slow to get your work done.
  • You can’t change the wallpaper of your computer, you are left with the black background.
  • A tiny error message above the notification area, which makes it hard to remove while taking the snapshots.
  • The laptop battery may drain quickly if you no longer thought of removing this error.
  • Some of the features are restricted unless you remove this error in your computer.
So, it was some of the reasons why you need to get rid of this error.
What are the other types of errors similar to this?
There are many of other types of Windows not genuine problem are around, but the step which I’ve mentioned below will help you in getting rid of this error.
Other types of error,
  • Windows is not genuine.
  • this copy of windows is not genuine 7601
  • This copy of Windows is not Genuine Vista.
  • This copy of Windows is not Genuine 6002.
  • This copy of Windows is not Genuine crack.
  • This Computer is not Running Genuine Windows.
  • This Copy of Windows is not Genuine 7600.
 Why Windows is not genuine error keep prompting?
There are many reasons why this windows not genuine error prompts, we’ve mentioned them below within which this error may occur.
The main reason behind this error is you are not using the genuine Operating System unless you have an official copy from the Microsoft Windows. If you’ve pirated version of Windows this is the first error you’ll get each time when you boot up your computer.
Another reason why this copy of windows is not genuine occur when your operating system expires are you’ve outdated one. I recommend you to keep updated your OS frequently either it may make a path for this genuine error with misconfiguration the system.
How to Fix “This Copy of Windows is Not Genuine” Error
Hope you’ve got a picture about what “this copy of windows is not genuine” error actually. Here we’ve arrived with the core part to fix this genuine error. It will work either you’ve Windows 32 /64-bit version, all you need to do is execute this process as mentioned below.
Step 1:
Go to start menu and search for CMD then you need to run the Command Prompt as administrator. In Windows 8 or later go press Windows Key + S, then enter CMD in the search box and right click on the Command prompt and run it as Administrator. If you’ve administrator access you can to go to the start menu or you can simply Press Win + R keys to open the Run program. Then enter CMD and press enter.
Step 2:
Once you’ve opened the Command prompt with the administrator privatization, then you need to SLMGR -REARM and press enter. then you’ll get a successful message about to restart your computer. Well guys, this command was not working on some Windows 7 versions so you can try this command: SLMGR /REARM.
Step 3:
Then you need to restart your computer to remove windows is not genuine error from your windows computer.


If you followed these steps you can easily remove this error in your computer. make sure you’ve followed the steps correctly without skipping them. Enjoy the error-free computer.
Is this error still remain unfixed? Are you getting any of below error?
1. Error 1: This maximum allowed number of rearms has been exceeded. Well, then let’s discuss how to fix this error.
1.  Open Run from Start menu or press Windows button + R.
2.  Now type: regedit.exe
3.  Follow this path now: HKEY_LOCAL_MACHINE -> Software -> Microsoft -> WindowsNT -> Current version -> SoftwareProtectionPlatform.
4.  Now, look for SkipRearm and click on modify, then change it’s value data from 0 to 1.
5.  Restart your computer now.
Now, follow above steps carefully again and this error should be fixed this time. Let’s discuss second case if you haven’t got that above error.
2. Error 2: SLGMR is not recognized as an internal or external command. Well, there are multiple reasons due to which this error generally occurs.
First Reason: Make sure you have pasted SLMGR -REARM command correctly. (Note that there is space betweeb dash and R).
Second Reason: Make sure you have opened Command prompt in Administrator mode. (if not, then from start menu look for Command Prompt, Right click on it and click on Run as Administrator).
Third Reason: There might be any problem with slmgr.vbs file. To fix this error, Open My Computer and Open C Drive now. Click on Windows folder, look for system32 folder and open it. Now, look for slmgr.vbs.REMOVEWAT (Or any extension of slmgr.vbs file). Just, rename this file to slmgr.vbs.
Now, try to follow method 1 again to fix this error again. Well, guys now this windows not genuine error will be removed now but it is not enough (if you are not using original version of Windows).
Method 2:
So here comes second method to fix this error. If above error fix didn’t worked for you, then you can give a try to this method.
Steps of fix using Command Prompt:
1.  Open Control Panel in your Windows from Start menu.
2.  Click on System & Security. (If you are a Windows XP user, then there is no need to click on System & Security).
3.  Click on Windows Update.
4.  Click on View Installed updates. (See below screenshot for reference)


5.  Now, look for KB971033 update. Right click on it.
6.  Click on Uninstall.
 7.  It will show a popup. Simply, click on Yes.
Restart your computer and you will find that you have got rid of this error now.
Method 3:
This method is based on RSOP also known as Resultant Set of Policy Window.
Steps to get rid of this error using RSOP:
1.  First of all, Press Windows button + R from your keyboard to open Run.
2.  Type rsop.msc and hit enter button.
3.  Now, follow this path simply: Windows Settings > Security Settings > System Services.
4.  Now, look for Plug and Play services.
5.  Right click on it, Just look for Startup and Click on Automatic.
6.  Now, open Run again by pressing Windows + R or you can open it from Start menu as well.
7.  Paste this command into run box: gpupdate /force & Press Enter.
Restart your computer. Congratulations, this error is gone forever.
So guys, We have already shared 3 methods to fix this windows not genuine error. So, I hope you have fixed this problem but now question arises in our mind is “Is it permanent fix?” Well, It’s permanent fix but still you have to keep certain things into minds to make sure that this copy of windows is not genuine will not pop up later.
1.  Disable Auto-updates of Windows: You should disable auto-update of Windows installed in your system to make sure that windows not genuine problem will not come again. You should not update your Windows manually also.
2.  Buy Windows license from Microsoft: If you have not bought Windows license from Microsoft, then you must buy official license from Microsoft official website.
So, it was all about this windows not genuine error fix. If you are still facing any problem, then feel free to comment below.
Final Words,
Error free computer experience is the everyone’s dream, among all those errors this copy of windows is not genuine is really an irritating error. If you followed the above-mentioned steps without any manual mistakes you can easily fix Windows is the genuine error. Hope you all benefited from this post, if you liked this feel free share it with your friends let them know on windows is not genuine fix. Please bookmark this page for further updates about windows not genuine error, that what I recommend.


Tuesday, May 24, 2016

How To Find Windows 10 Product Key And How To Activate It

This is how to find your Windows 10 product key and activate it


Whether you used Microsoft’s free Windows 10 upgrade offer or got a new license off retail, MSDN and the likes, you need to know how to find your Windows 10 product key and how activation works on free upgraded as opposed to new retail copies of Windows 10. Here’s everything you need to know about Windows 10 product keys and activation process.

Upgrading to Windows 10:

If you have used a genuine copy of either Windows 7 or Windows 8/8.1 to upgrade your PC to Windows 10, then your license will be tied to the hardware you upgrade on, and not your Microsoft account. In this case, you won’t get any new product key either. This can be verified by using any third-party product key software like ProduKey or The Ultimate PID Checker. They will show you generic product keys like TX9XD-98N7V-6WMQ6-BX7FG-H8Q99 for Windows 10 Home and VK7JG-NPHTM-C97JM-9MPGT-3V66T for Windows 10 Pro edition.

Clean Installation of Windows 10:

If you want to perform a clean installation of Windows 10 on the same machine, you can download an ISO file, turn it into a USB drive or DVD media and then run the setup for clean install. During the installation, Windows setup will ask you to provide product key, just skip this step and allow the installation to complete. Once clean installation of Windows 10 is complete, your copy of Windows will activate automatically as soon as you connect to Internet. This happens as Microsoft knows you clean installed on the same hardware. To check your activation status of Windows 10, you can either go to
Settings (WinKey+I) > Update & security > Activation:

Student Hacks Teacher’s Email Account, Sends Porn To Parents, Teachers, And Students


Short Bytes: A teenager student from Gilbert recently broke into the email account of his teacher and used it to send pornographic images to other teachers, students, and parents. The school has now disabled the email accounts and an investigation is being carried out by the FBI and local police.


According to a report, a student at the Highland Junior High School in Mesa, Arizona broke into the email system of his school. He gained access to a teacher’s email account and used that to send inappropriate messages to others.
This school is a part of the Gilbert Public Schools District. The District explains that the student got access to the teachers email login information and e-mailed pornographic content to other students, staff, and parents.
“You could say the student was trying to embarrass the teacher,” said school board member Daryl Colvin,
Recently the school also came into the limelight for its decision to buy Chromebooks for each student. The Gilbert residents expressed their concerns regarding students accessing porn.
However, as soon as the school’s technology department came to know about it, it quickly disabled the student and teacher accounts.
The school also called the FBI and Mesa Police to investigate the case. As the student is a minor, his name hasn’t been revealed to the public.

Friday, May 20, 2016

How to Repair a damaged USB Flash Drive

Do you have a USB flash drive that just won't work anymore? Assuming the hardware is undamaged, and you don't mind losing all your files, you could try formatting the USB drive.

Methods of Repairing Physical Damage

1.  Decide if your files are unimportant enough to risk a DIY attempt at data recovery. If your decide your files are too important to risk, you will want to find a flash drive data recovery company.
  • These companies have special hardware and tools designed to repair circuit boards. The more advanced companies have the tools to remove the NAND memory chip from the circuit board in order to extract and unscramble the raw data stored inside.
2.  Get the tools. If you decide you are comfortable risking your files, you will need:
  • A soldering iron with solder and flux
  • An old USB cable
  • Wire cutters/strippers
  • A small flathead screwdriver
  • A magnifying glass or jeweler's loop
  • Note: These steps only apply if your flash drive has a broken connector.

3.  Using the flathead screwdriver, carefully remove the flash drive's outer casing.

4.  Use the magnifying glass to inspect the circuit board (PCB) and solder pads. If the PCB itself is damaged or the solder pads are lifted, you will probably need the help of a professional.
  • Note: Solder pads are the 4 bits of solder that connect the prongs of the USB connector to the copper lines in the circuit board. If the connector has broken away without causing damage to the PCB or solder pads, continue to the next step.
5.  Set the flash drive on a hard surface with the connector end facing toward you and the solder pads facing up.
6.  Use the wire cutters to cut one end off of the USB cable. Cut the female end if it's not male-to-male.
7.  Use the wire strippers to expose about 0.25 inch (0.6 cm) of each of the four wires inside the cable. Or, if you do not have a spare USB cable to use, you may solder pieces of small gauge electrical wire to each of the prongs on the broken USB connector; this will create your own mini USB cable.
8.  Solder each of the four wires to the four solder pads. The colors from left to right are black, green, and white, red. They should attach to the solder pads in that order, from left to right, when you're holding the USB so that the two cutout rectangles are facing up and away from you
·        Do not mix these up or your flash drive (and files) are toast.
·        If you used your own individual wires instead of a cable, simply solder each wire straight across to the corresponding pad regardless of what color the wire is.

9.  Plug the other end of the USB cable into a computer and cross your fingers.
  • If it registers, great! Just save your files to your computer.
  • If it's still not being recognized, it's likely that there is a different underlying problem that can't be seen with the naked eye. Either consider sending it to a professional recovery company, or use it as a Christmas Tree ornament that reminds you to always back up your important files.

Monday, May 16, 2016

HP Pavilion x2 - 10t Touch Laptop futures.

Product specifications
Operating system
Windows 10 Home 64
Processor and graphics
Intel(R) Atom(TM) Z8300 Processor + Intel(R) HD Graphics (32G)
Intel(R) Atom(TM) Z8300 Processor + Intel(R) HD Graphics (64G)
Display
10.1-inch diagonal WXGA WLED-backlit IPS Display (1280x800) Touchscreen
Memory
Onboard 2GB Memory
Hard drive
32GB eMMC
64GB eMMC
Office software
Office Software Trial
McAfee LiveSafe(TM) Security Software
Security Software Trial
$25 off McAfee LiveSafe 12 months
$50 off McAfee LiveSafe 24 months
$75 off McAfee LiveSafe 36 months
Theft protection
Computrace LoJack for Laptops, One Year
Computrace LoJack for Laptops, Two Years
Computrace LoJack for Laptops, Four Years
Primary battery
2-cell 33WHr Lithium-ion Battery
Color
Turbo silver
Blizzard white
Sunset red
Keyboard
Standard Keyboard
Personalization
HP TrueVision HD Webcam with Digital Microphone (turbo silver)
HP TrueVision HD Webcam with Digital Microphone (blizzard white)
HP TrueVision HD Webcam with Digital Microphone (sunset red)
Networking
Intel 802.11ac WLAN and Bluetooth(R) [1x1]
Audio
B&O PLAY with 2 speakers
Pointing device
HP Imagepad with multi-touch gesture support
Expansion slots
1 multi-format SD media card reader
External I/O Ports
1 USB 2.0 (Type-C); 1 USB 2.0; 1 HDMI; 1 headphone/microphone combo
Power supply
15 W AC power adapter
Energy efficiency
ENERGY STAR® certified; EPEAT® Silver registered
Dimensions (W X D X H)
10.39 x 6.81 x 0.78 in
Weight
2.62 lb
Warranty
1-year limited hardware warranty, toll-free support
Software included
McAfee LiveSafe™ 30-day trial offer (Internet access required. First 30 days included. Subscription required for live updates afterwards.)